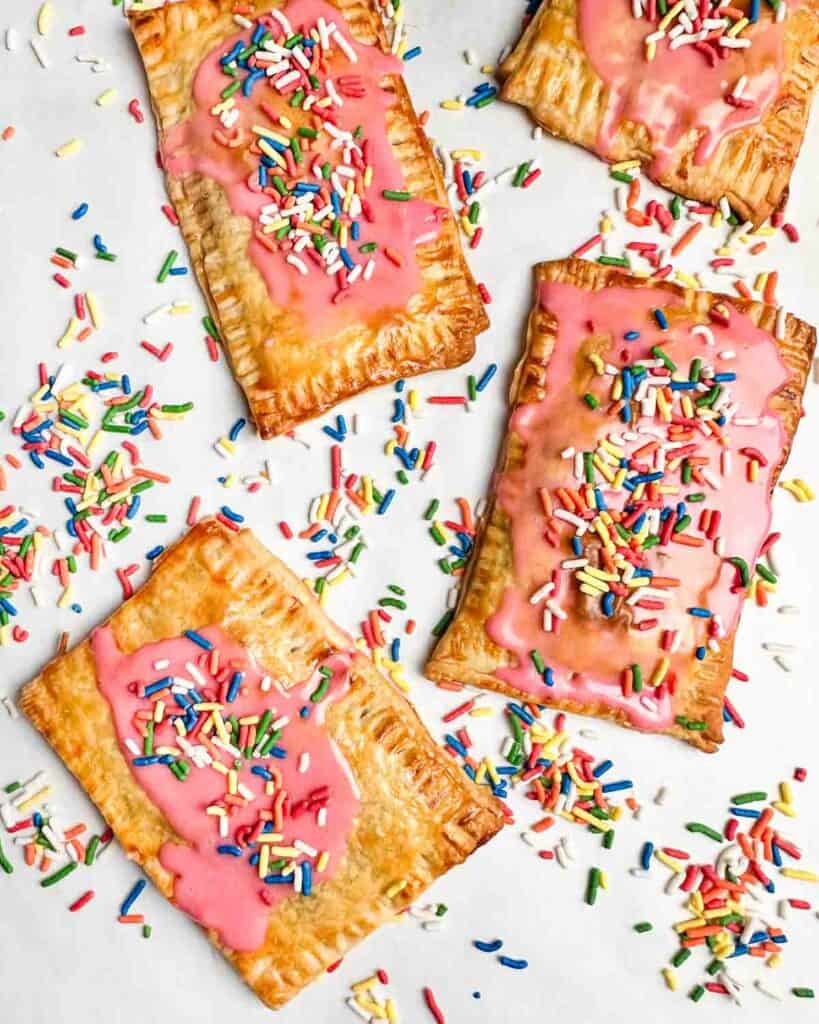
Homemade Strawberry Pop Tarts Recipe


This homemade strawberry pop tarts recipe is a sweet way to brighten up any morning or even perfect as an afterschool snack. And with some easy hacks, you could get the kids involved and it won’t take long to make them.
Post may contain affiliate links. As a member of the Amazon affiliate program, I may earn a small commision from qualifying purchases. To read my affiliate policy, click here.
Ok, Swifties, this one is for you.
And even if you’re not a Swiftie but just want a fun, kid friendly snack and/or breakfast, come on in!
Why is this for the Swifties?
Well, Taylor Swift and Travis Kelce have both talked about her homemade pop tarts several times.
And, we are huge Swifties in this house, and are super excited for TS 12 so I’ve embarked on a little bit of a project to combine my love of all things Taylor with baking by baking up some recipes inspired by her.
We did fun orange glitter sugar cookies.
Today?
A (semi) homemade strawberry pop tarts recipe.
To be fair, she probably bakes hers from scratch.
And you can too if you want and make the pie crust totally yourself and even make your own filling.
But we’re shortcutting here to turn homemade pop tarts into a treat that’s easy enough to make as a kid friendly special breakfast or afterschool snack with store bought ingredients.
Ingredients and Kitchen Supplies
Here’s what you need for homemade stawberry pop tarts:
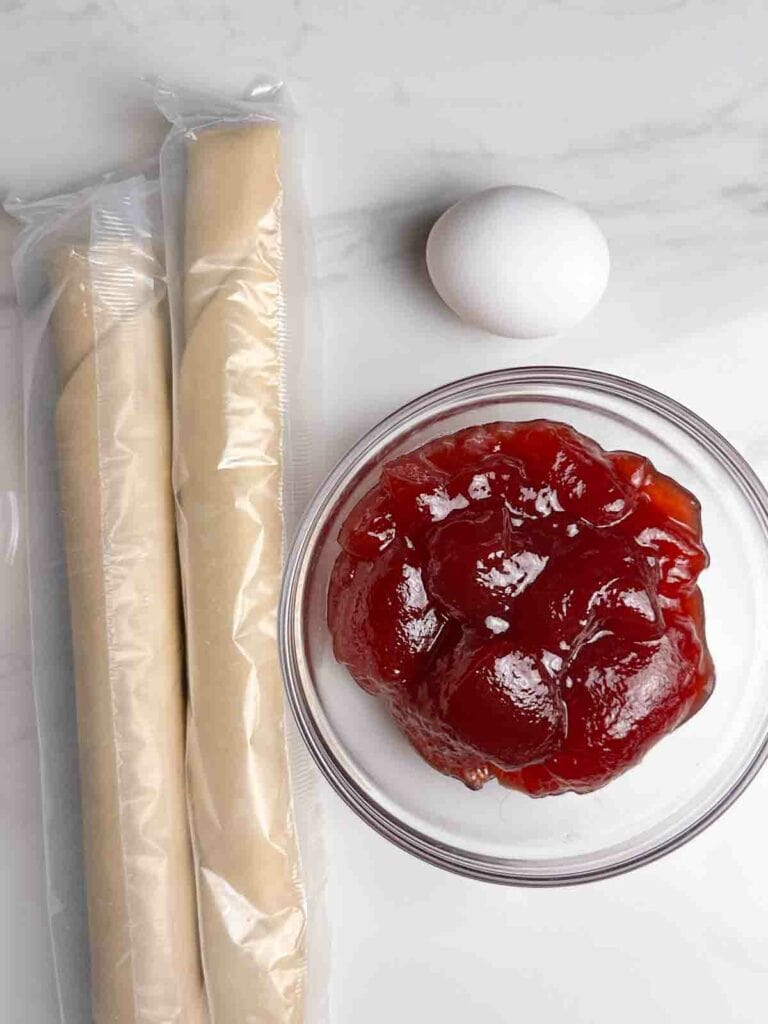
- Store Bought Pie Crusts – You can use whatever brand you like, but look for the ones that get rolled and sold in a two pack. You could also use your favorite recip
- Strawberry Jam – Strawberry jam will have the best consistency for the filling out of strawberry preserves, jam, and jelly. Preserves will be too chunky since it’s made from whole fruit. Jelly will be a little too thin since it’s made with fruit juice. Jam is made from pureed fruit so the texture is just right for pop tarts.
- Egg – You use this for an egg wash that gives the pop tarts a golden brown outside.
- Water – You need a small amount for the egg wash.
For the icing, you will need:
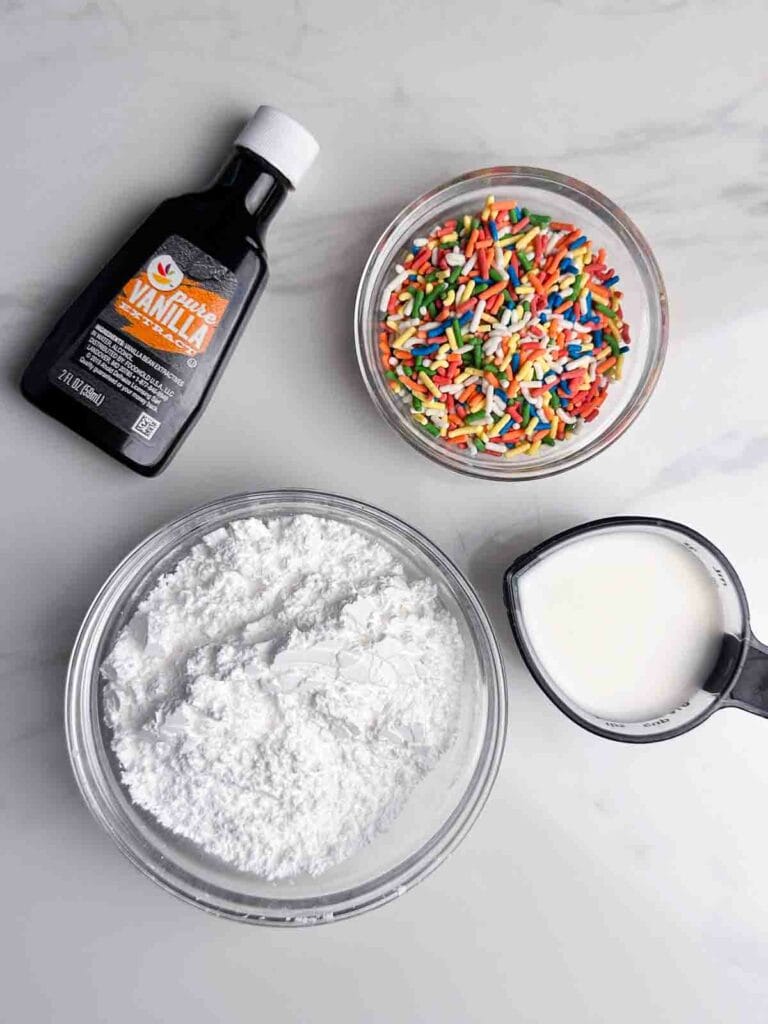
- Powdered Sugar – This gives the icing sweetness and helps it harden as it dries.
- Milk – Allows you to mix the icing.
- Vanilla Extract – Adds bit of flavor to the icing. You could use other extracts, but vanilla works well with the raspberry filling.
- Red Food Coloring – You just need about a drop to turn the icing pink, but you can also skip this.
- Rainbow or Other Sprinkles – Sprinkles add a pop of color and fun. You can skip them, but then you are probably just not very fun…or you don’t feel like endlessly cleaning them up.
You do not need any special equipment, but these things help:
- A 3×5 or similar sized index card – for cutting a rectangle shape.
- Cookie Sheet(s)
- Knife or Pizza Cutter
- Rolling Pin – This allows you to squeeze out another pop tart from the scraps.
How to Make Homemade Pop Tarts
1. Cut out the pop tarts shapes.
Before you start, preheat your oven to 400 degrees F.
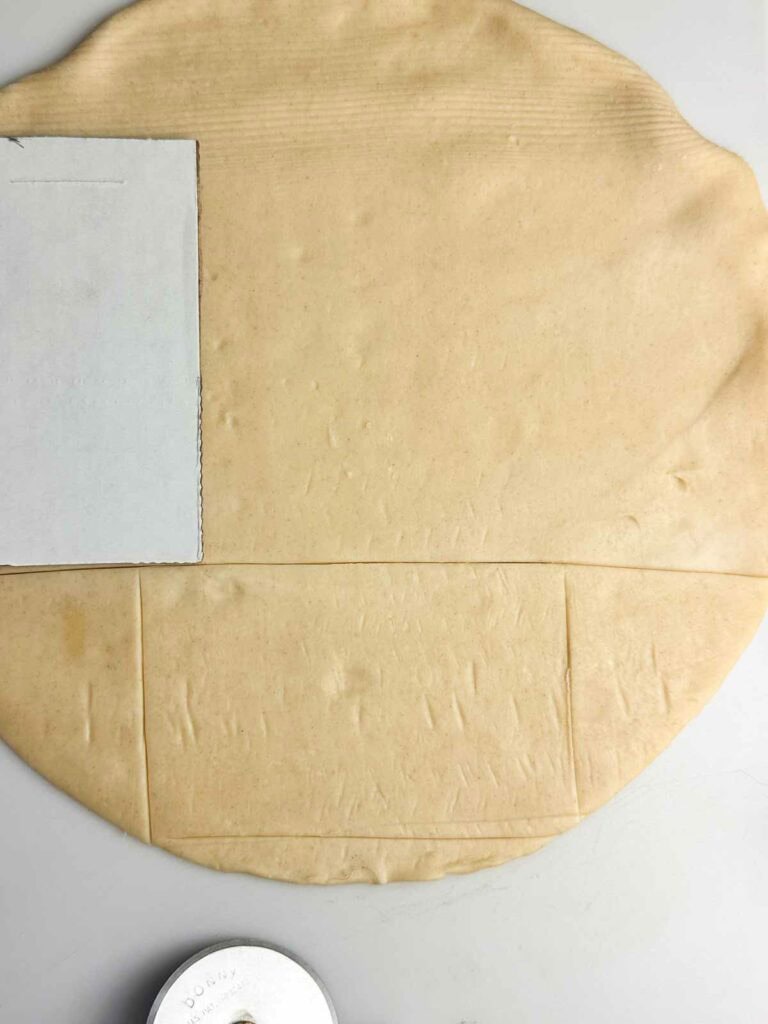
Unroll the first pie crust on a flat, clean surface.
We use a 3×5 index card (well, actually, this time the hubs cut a box to shape, but same thing basically) to guide our pizza cutter when cutting out the tops and bottoms.
Leave as little room between as possible and keep cutting out rectangles.
Repeat for the second crust, carefully setting the rectangles aside for later.
Once you have cut out as many as you can, knead the dough back together and then flatten the remaining scraps with a rolling pin.
Cut out the rectangle shapes from the remaining crust.
You should get about 10 rectangles from the two crusts, enough for 5 homemade pop tarts.
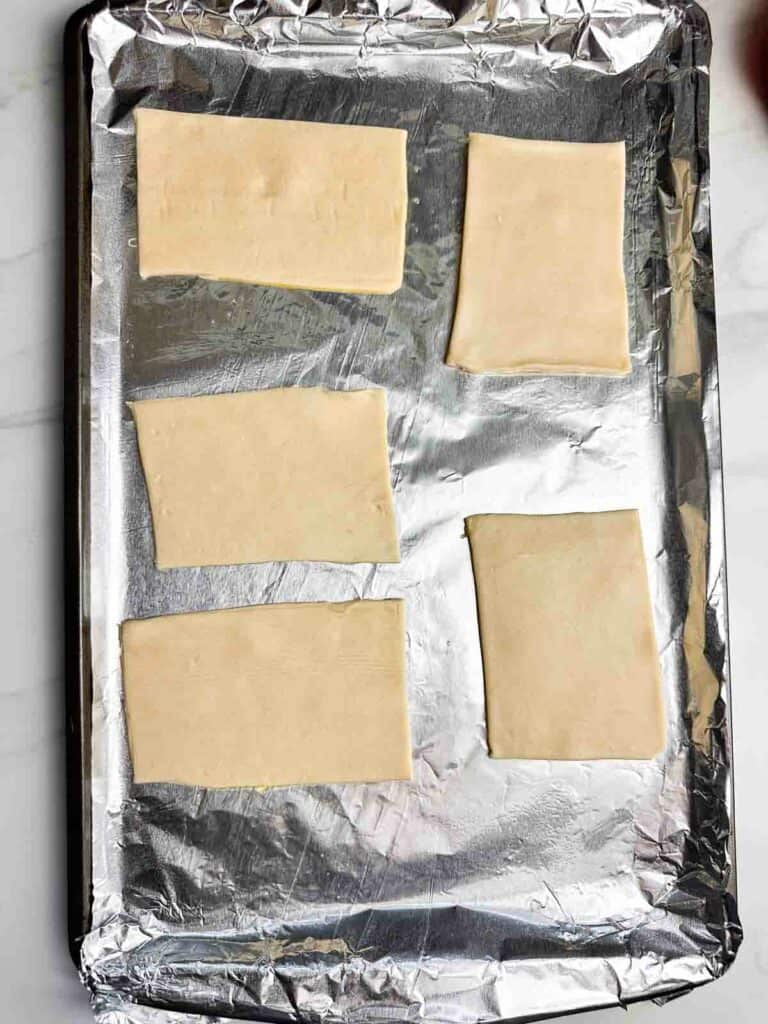
Put 5 of the crusts down on a baking sheet lined with foil.
2. Fill the pop tarts and seal.
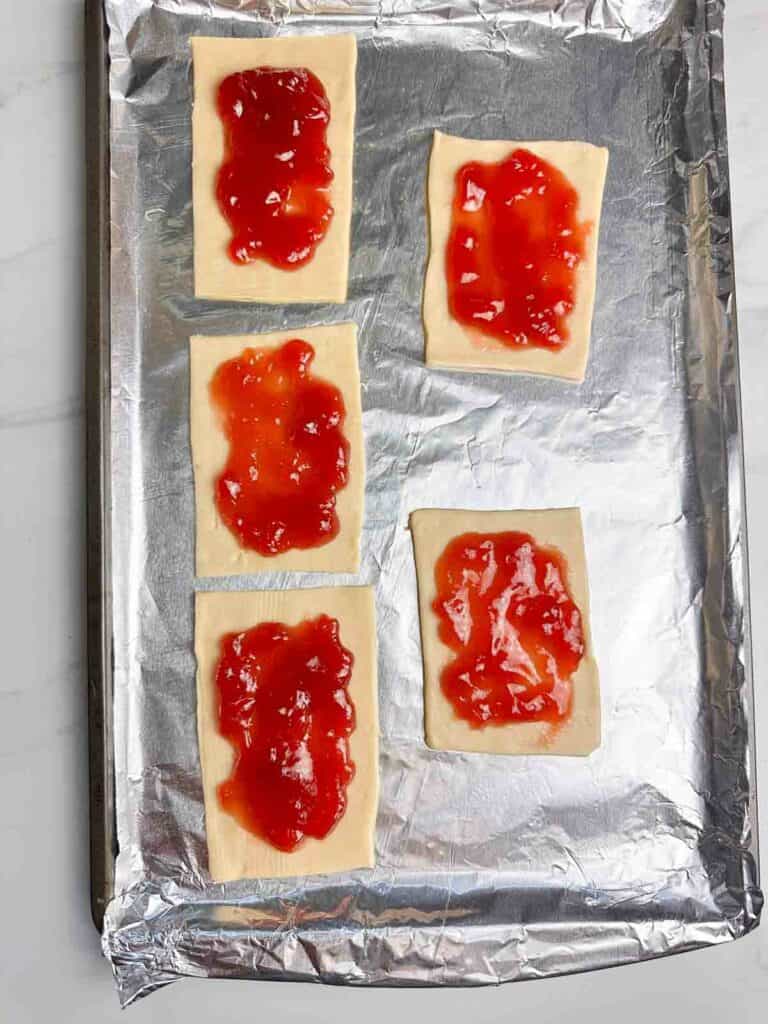
Place about 1.5 tablespoons of raspberry jam in the center of half of the crusts, spreading it around evenly.
Leave about a 1/2 inch around the outside to help seal the pop tarts.
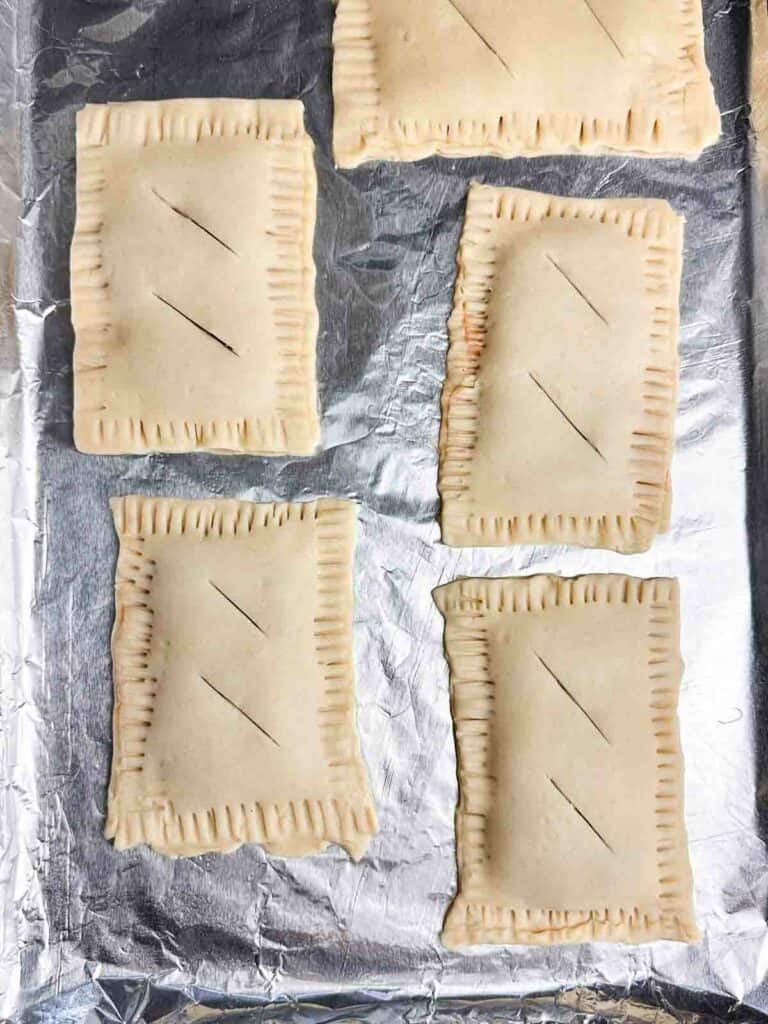
Carefully lay a second rectangle on top of the filling and gently push the edges down on all sides to seal in the filling.
Use a fork to create a fringed edge.

Finally, cut two to three slits across the top of the pop tart to allow venting.
Repeat the same process until you have 4 to 5 pop tarts ready to bake.
3. Coat and bake the pop tarts.
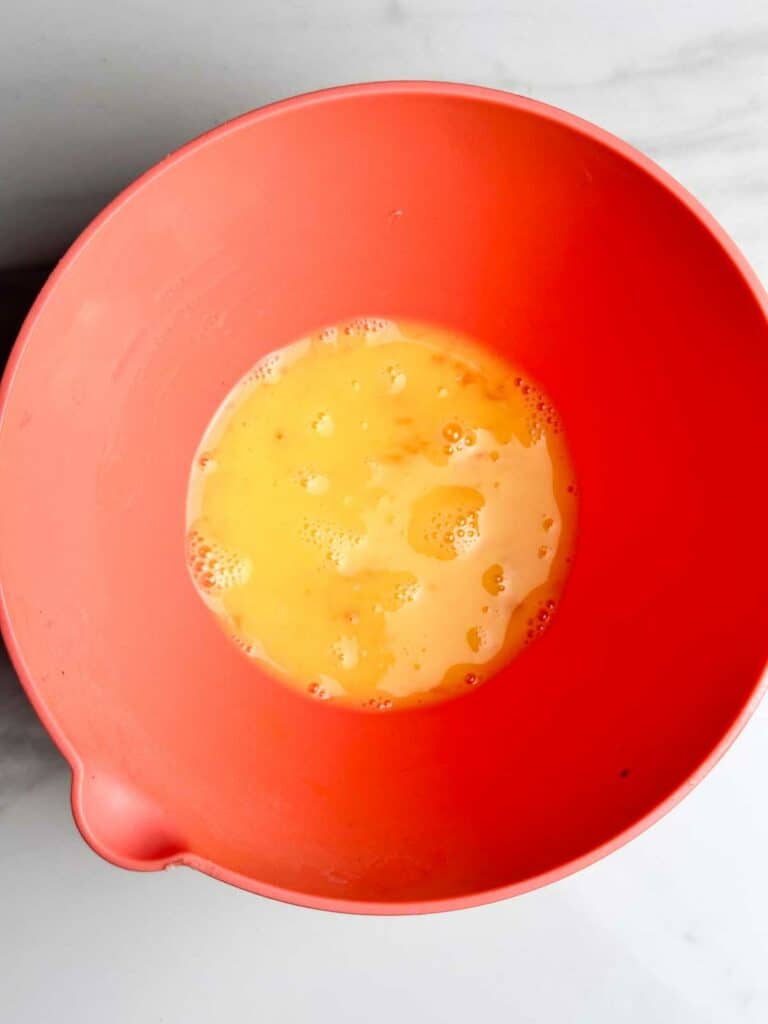
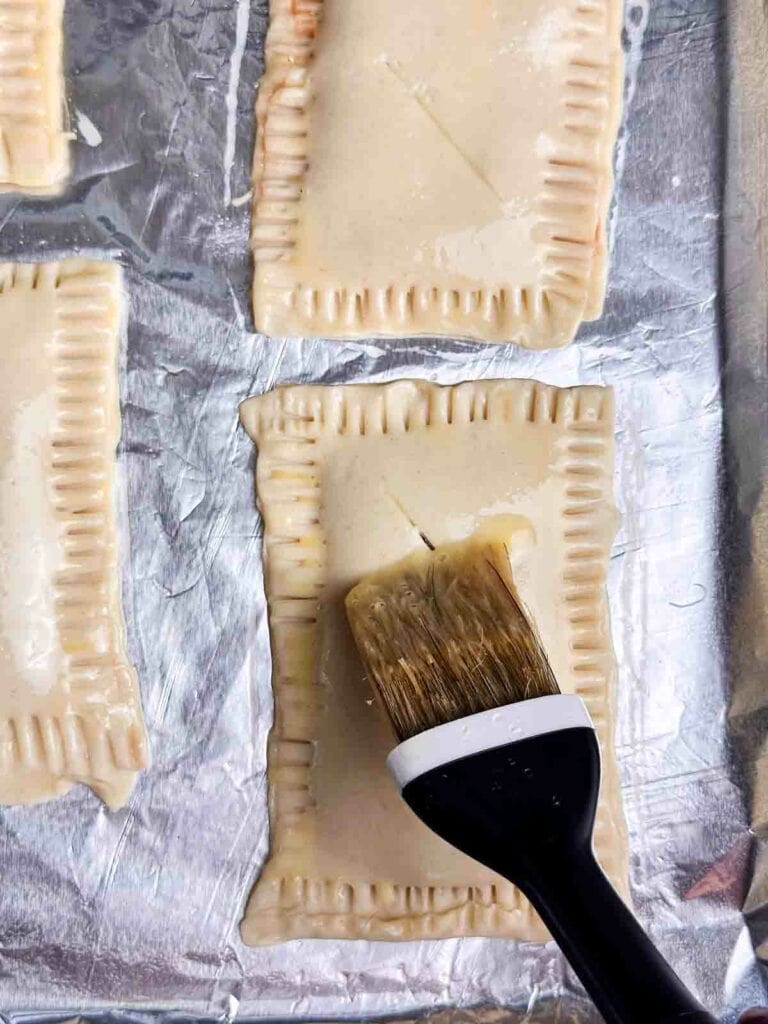
In a small bowl, whisk the egg and water until combined.
Use a brush or spoon to top the pop tarts with the egg wash.
Bake for about 12 to 15 minutes, or until the tops turn golden brown.
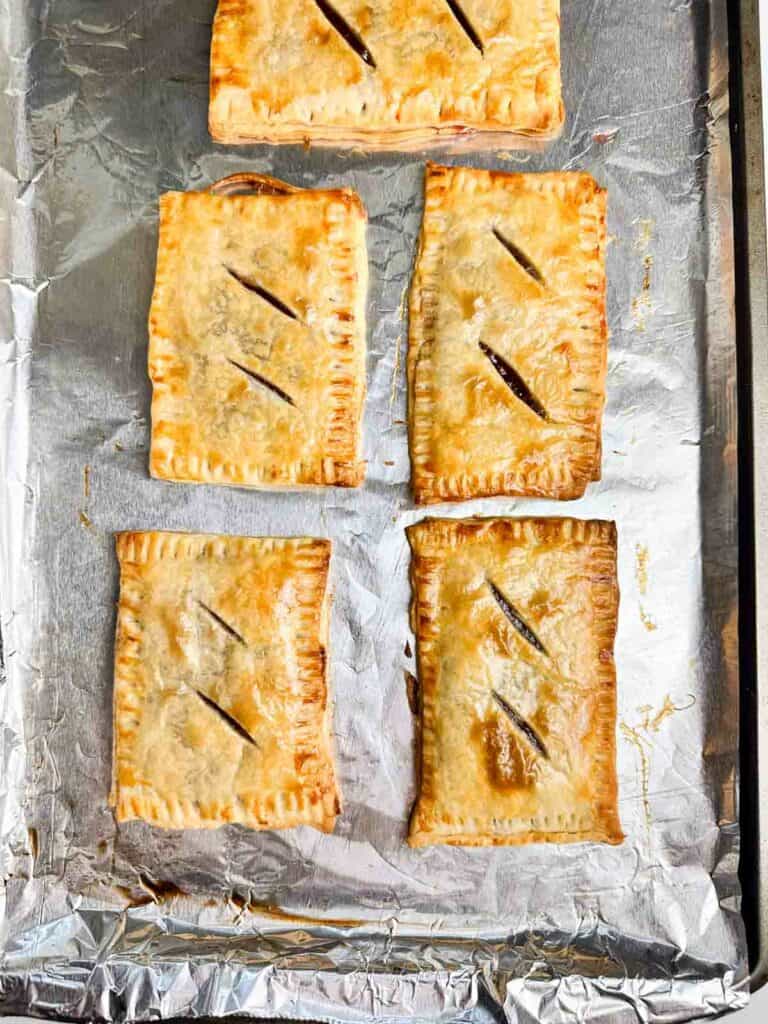
Carefully remove from the oven and allow to cool.
4. Ice the pop tarts.
You can completly skip this if you want but otherwise get the icing ingredients out (except the sprinkles) and combine them in a small bowl, only adding a tablespoon of milk at a time.
It should form a thick, but pourable icing.
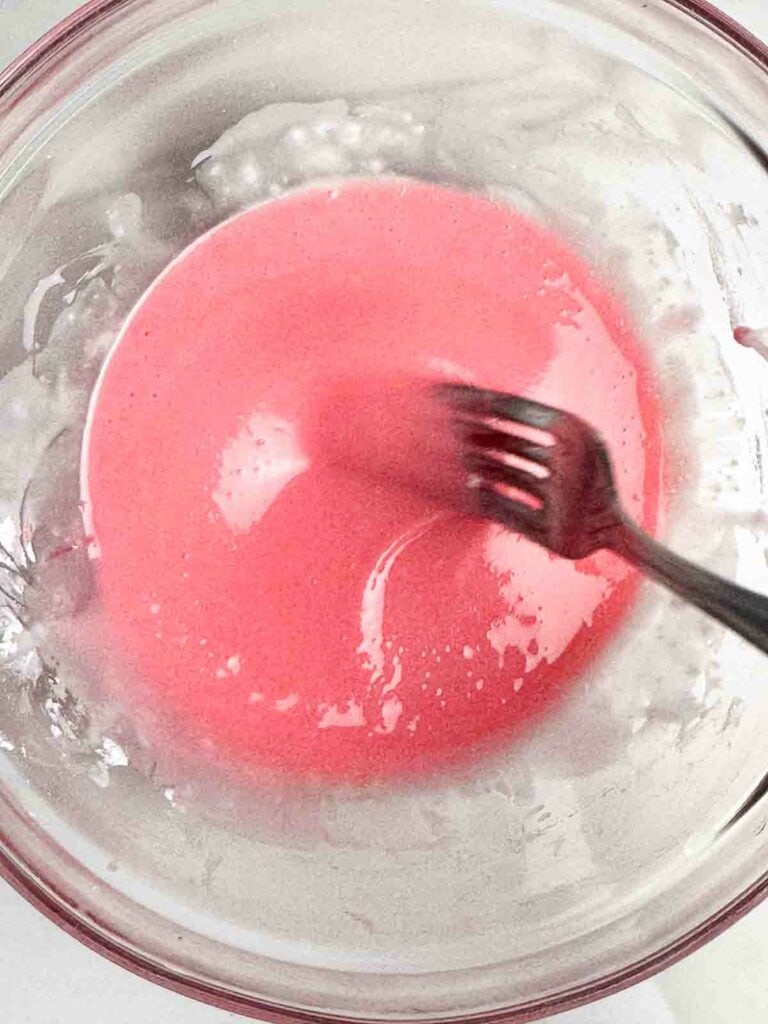
You only need about 1 drop of red food coloring to create a pink color for the icing, or you can skip it.
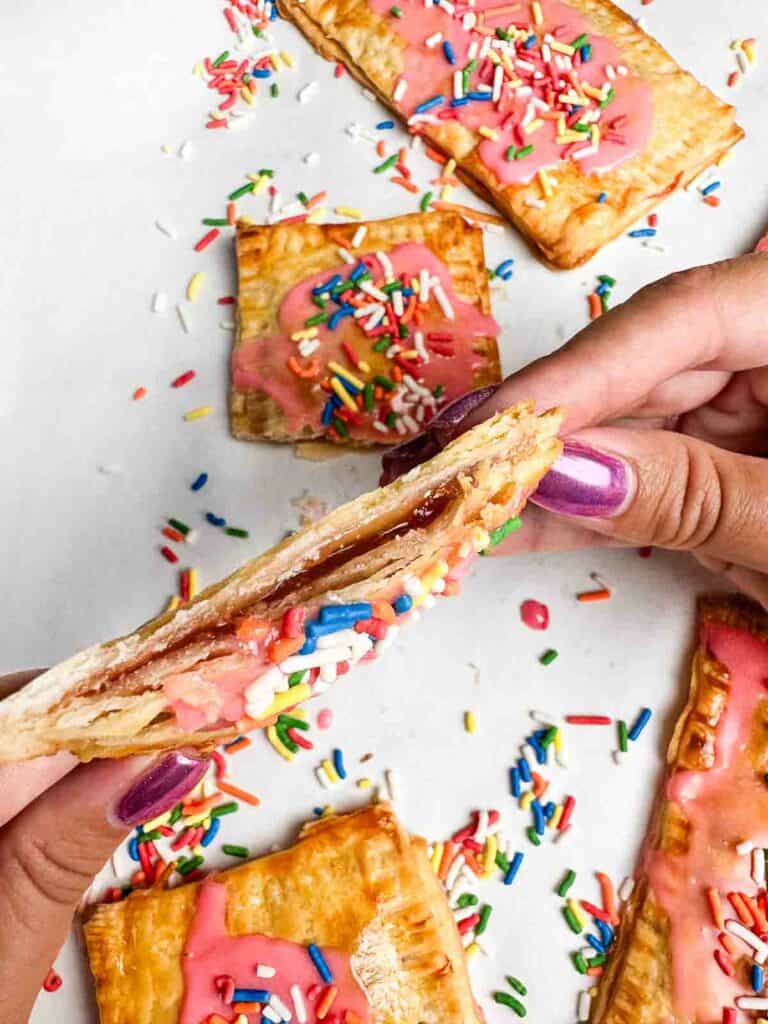
Once combined, spoon the icing on top of the cooled pop tarts, spreading it out to be a thin even layer.
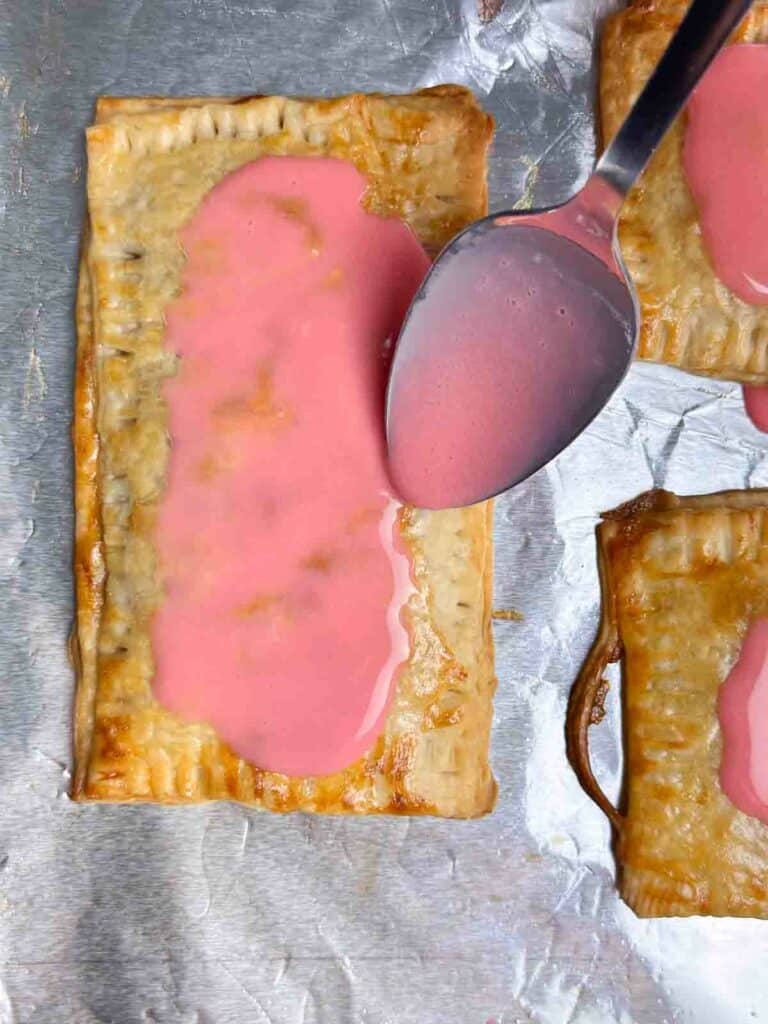
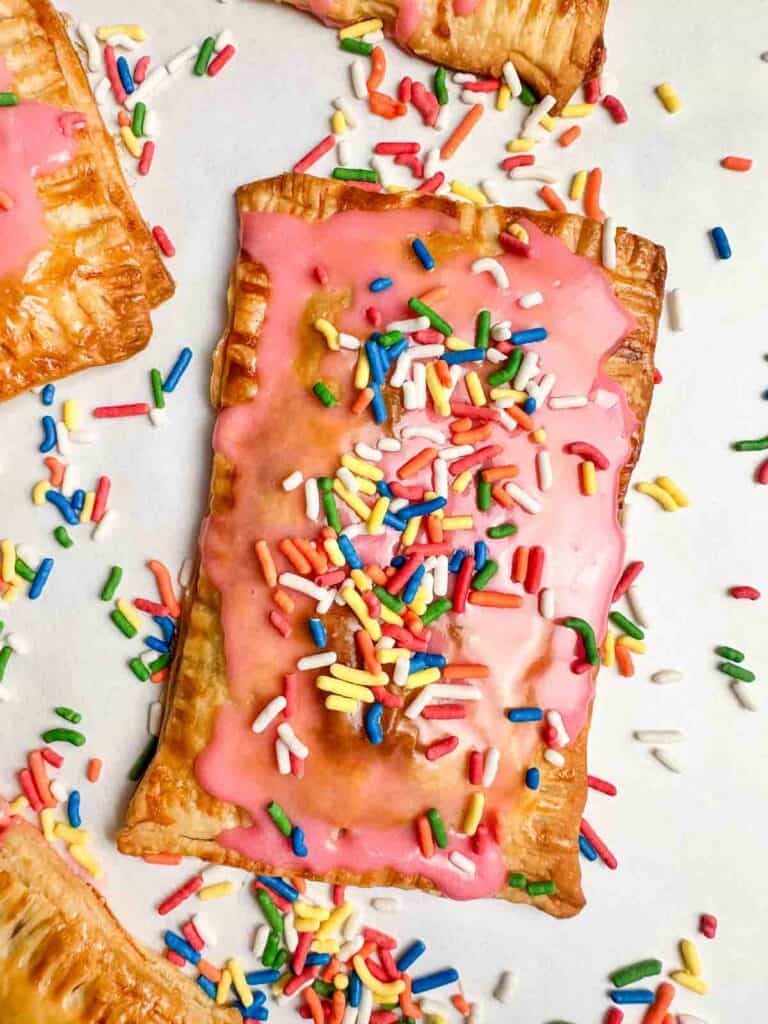
Sprinkle the rainbow sprinkles over the top of each pop tart before the icing has a chance to set.
Allow the icing to set, about 10 minutes, and then serve or store.
Serving
You can serve homemade strawberry pop tarts as a fun after school snack or special sweet breakfast in the morning.
You can warm them in the microwave for a few seconds before serving.
Due to the slits on top and homemade icing, you should not place these in a traditional toaster.
Unless you want a mess and a reason to buy a new toaster.
But seriously don’t do it.
Storing
To store, place the homemade pop tarts in an air tight container.
We refrigerate them so they can stay fresh for about 5 to 6 days.
You could store them on the counter, but they won’t last as long.
You can eat them chilled or room temperature or heat them in the microwave for a few seconds.
You can also freeze them if you like.
Just makes ure to put them in freezer safe container or bag.
They should stay fresh for about 6 months frozen.
Reheat in the microwave when frozen.
Tips and Tricks
- For ease, we use a rectangle shape, but you could use fun shaped cookie cutters if you like. Just make sure they are easy to work with and allow you to fully seal the filling inside.
- If you decide to use cookie cutters, I don’t recommend using an intricate cookie cutter like a snowflake. Stick to simple shapes like heart cutters or even pumpkin cookie cutters which make for really cute pie crust creations like these Pumpkin Hand Pies.
- Avoid over stuffing the pop tarts. This can lead to them bursting or leaking out the sides.
- You do not have to use an egg wash, but they will not get as golden brown without it or have the pretty shiny finish.
- If you don’t want to color your icing, don’t. You also do not need to add sprinkles.
- You could also switch the sprinkles up with seasonal sprinkles like pumpkins or leaves for fall, ghosts for Halloween, hearts for Valentine’s Day, etc.
- This recipe will work with any flavor jam your little heart desires so feel free to go crazy and try raspberry, apricot, grape, or any other flavor you can think of.
Other Easy Snacks
If you like easy to make and eat snacks and desserts, try these other options:
- Pumpkin Hand Pies
- Easy Pumpkin Donuts
- Easy Gingerbread Donuts
- Homemade Tortilla Chips
- Corn Tortilla Chips
Did you make this? Let me know!
Did you make homemade pop tarts or any other recipe on my site? Leave me a comment below and let me know how you liked it. And make sure you follow along with me on Facebook, Pinterest and Instagram to see everything we’ve got going on.
Ingredients
- 1 package pie crusts
- 1/2 cup raspberry preserves
- 1 large egg
- 1 tablespoon water
For the icing
- 1 cup powdered sugar
- 4 tablespoons milk
- 1 teaspoon vanilla extract
- 1-2 drops red food coloring
- 2 tablespoons rainbow sprinkles
Instructions
- Preheat your oven to 400 degrees F.
- Roll out the first pie crust on a flat, clean surface.
- Using an 3×5 index card as a guide, cut out as many rectangles as you can.
- Repeat for the second pie crust.
- Collect the scraps, knead them together, and then roll it out.
- Use the index card to create additional rectangles.
- You should have about 10 rectangles.
- Place half of the rectangles on a baking sheet.
- Spoon about 1.5 tablespoons of raspberry jam into the middle of each rectangle.
- Spread around the jam into an even layer, leaving about 1/2 inches around the filling.
- Carefully place a second rectangle on top of each prepared pie crust.
- Gently push the top and bottom pie crust together, sealing the raspberry filling inside.
- Use a fork to crimp the edges and use a knife to cut 2 to 3 slits into the top of each pop tart.
- In a small bowl, whisk the egg and water together to create a wash. Brush the wash over top of each pop tart.
- Place the cookie tray in the oven and bake for 12 to 15 minutes or until the tops turn golden brown.
- Carefully remove the pop tarts from the oven and allow to cool.
- Once cooled, combine the powdered sugar, vanilla, milk, and red food coloring in a small bowl with a fork or whisk.
- Spoon a small amount of icing on top each pop tart, spreadng it around with a spoon.
- Sprinkle the sprinkles over each pop tart and allow the icing to set for about 5 to 10 minutes.
- Serve as a snack, dessert, or breakfast.